
Backyard Pergola Ideas: Designs, Materials & How to Choose the Right Style
Winnie Astrid
Garden Design Editor
Thirty pergola designs follow, with materials, costs and sizes — but the decision that changes this project most is the one most idea galleries leave out. Keep the pergola freestanding and under 200 square feet and the model building code exempts it from a permit entirely. Every size worth building on a normal patio, up to 12×16 ft, fits inside that; attaching it to the house does not, whatever its area. So the sequence here is backwards from the usual: the threshold first, then proportions, clearances and orientation, then materials, then the thirty designs.
Pergolas are not about shade alone — they define outdoor rooms, frame views, and turn flat patios into spaces people actually use. Placement, material and proportional sizing decide whether one reads as an intentional anchor or an expensive afterthought, and this guide covers each in turn, including the material trade-offs a quote will not itemise.
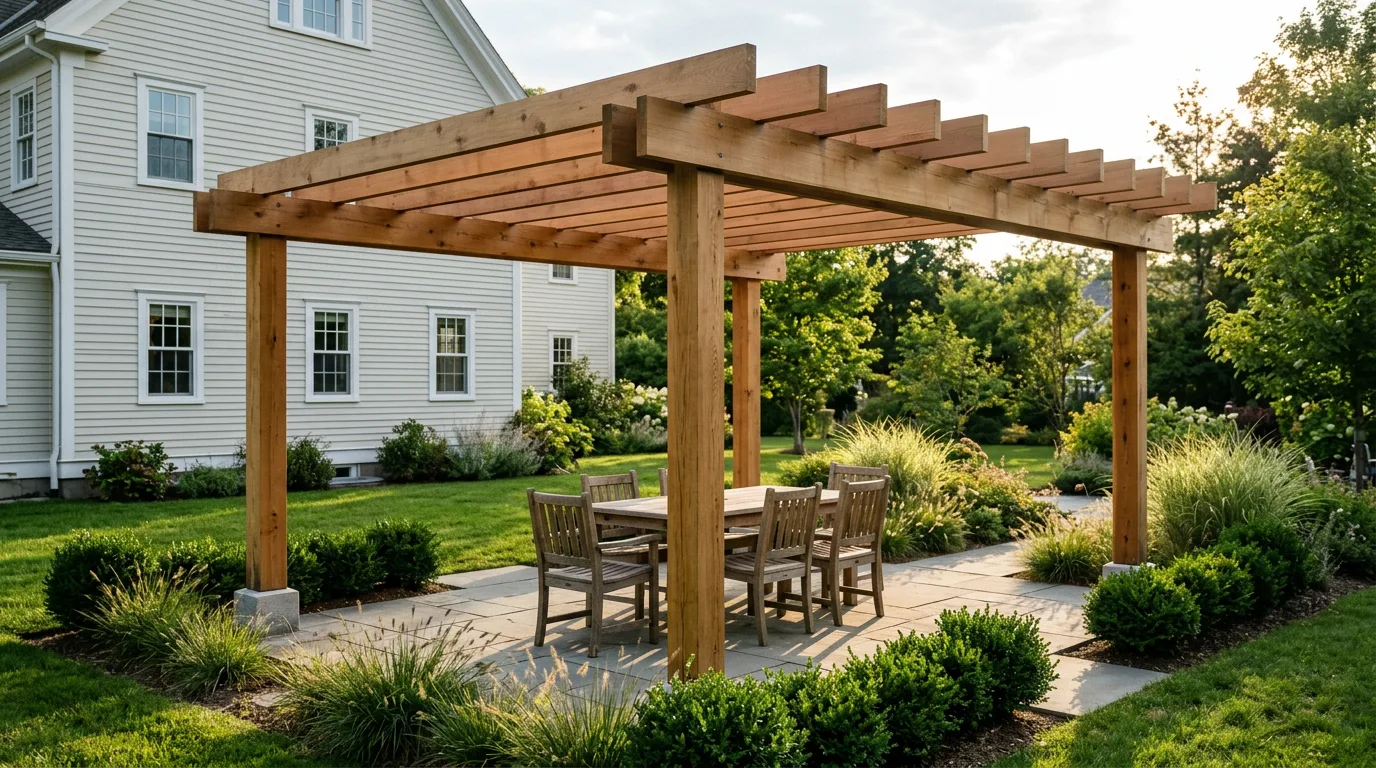
Quick answer: which pergola is right?
- Patio cover adjacent to the house: Attached cedar pergola, 10×12 ft minimum, 9 ft clearance — $5,000–$8,000.
- Modern home, low maintenance: Powder-coated aluminum with built-in LED strips — $6,000–$10,000.
- Mid-yard garden focal point: Freestanding timber-frame pergola in natural cedar or steel — $7,000–$12,000.
- Full shade required: Add retractable canopy ($800–$2,000) or climbing vines (wisteria, grapevine) for 70–80% coverage.
- Tightest budget: Pressure-treated pine, DIY-friendly kit — $1,500–$3,000 materials only.
Pergola vs Gazebo vs Arbor: Definitions and Use Cases
The terms are used interchangeably in marketing, but the structures serve different functions. Choosing the wrong one for your space is the most common backyard structure mistake.
Pergola
An open-roof structure with parallel rafters supported by posts, sized to cover a functional outdoor zone — a dining table, lounge seating, or a hot tub. Minimum footprint 10×12 ft for usability. The rafters run perpendicular to the house wall if attached (for maximum shade) or aligned with the longest dimension if freestanding. Provides 30–50% shade from rafters alone; 70–80% with climbing plants after 2–3 seasons.
Best for
Defining outdoor rooms adjacent to the house, creating vertical structure over patios, supporting climbing plants for progressive shade.
Gazebo
A fully roofed, freestanding pavilion with a floor (typically elevated 6–8 inches), round or octagonal plan, and open or screened sides. Always freestanding, never attached to a structure. The solid roof provides full rain and sun protection, which makes it usable in all weather but also visually dominant — a gazebo is a focal point, not a background element.
Best for
Mid-yard or garden-edge focal points, sheltered seating areas in large properties, spa or hot tub enclosures, traditional or Victorian garden aesthetics.
Arbor
A narrow arched or flat-topped frame over a path or gate, typically 3–4 ft wide and 7–8 ft tall. It frames a transition between garden zones — lawn to patio, front yard to back — and is almost always planted with climbing roses, clematis, or wisteria. An arbor is decorative and transitional; a pergola is functional and defines a zone.
Best for
Garden entrances, pathways between zones, framing views, small-space vertical planting support. Not suitable as patio cover or seating area structure.
Rule of thumb
If it covers a functional zone (dining, lounging), it is a pergola. If it is a destination in itself with a roof, it is a gazebo. If it is narrow and frames a path, it is an arbor.
Pergola Styles: Freestanding, Attached, Modern & Rustic
Style choice is as much about structural placement and material as it is about aesthetic. The right pergola style complements your home’s architecture and serves your yard’s functional zones.
Attached pergola
One side fastened to the house via a ledger board, the other supported by posts. Creates a true outdoor room extension from a back door or kitchen. Costs 20–30% less than a freestanding structure because it requires two posts instead of four and uses the house wall for lateral bracing. The most common residential pergola configuration.
Design rules
- Size rafters for the span first, then let trim decide between the sizes that work. A 2×6 and a 2×8 are not interchangeable over the same clear span — the depth you need comes from span, spacing and lumber species, and the American Wood Council’s free span options calculator runs it for every commercially available species and grade. Matching the house trim is the right tiebreaker; it is not a way to choose whether 2×6 is adequate.
- Run rafters perpendicular to the house for maximum shade coverage
- Ensure the ledger board attaches to structural framing, not siding alone — improper attachment is the primary failure mode
Freestanding pergola
Four-post structure standing independently, positioned anywhere in the yard. Used to define mid-yard seating zones, cover hot tubs or fire pits, or create a garden destination away from the house. Requires deeper footings (30–36 inches in freeze-thaw climates) and diagonal knee bracing for lateral stability. More expensive but far more flexible in placement.
Design rules
- Orient the longer dimension toward the primary view or house sightline
- Add decorative knee braces rather than plain diagonal struts — the underside is fully visible from all angles
- Run electrical conduit during footing pour if lighting or fans will be added — trenching afterward is significantly more expensive
Modern steel or aluminum pergola
Powder-coated steel or extruded aluminum frame with thin structural profiles (3–4 inches vs 6–8 inches for timber). Creates clean, minimal lines that suit contemporary architecture. Aluminum is maintenance-free; steel is stronger and allows thinner members but requires powder coating to prevent rust. Both materials integrate LED strip lighting and retractable canopy tracks more elegantly than wood.
Design rules
- Choose matte black, charcoal, or white finishes — metallic or gloss reads as commercial
- Match to existing window frames or railing colour for visual cohesion
- Metal pergolas do not support climbing plants well — use freestanding trellises or planters if vines are desired
Rustic timber-frame pergola
Heavy timber construction with mortise-and-tenon or bolted beam joinery, exposed structural connections, and natural or stained wood finish. Posts are typically 6×6 or 8×8; beams are 4×8 or larger. The aesthetic is traditional, cabin, or farmhouse. This style has the highest material and labour cost but also the longest lifespan and strongest character development over time.
Design rules
- Use rough-sawn or hand-hewn timber for authentic rustic character — planed smooth timber reads as generic
- Expose joinery rather than hiding it — decorative through-bolts and steel brackets are part of the aesthetic
- Allow natural weathering to silver-grey or apply a penetrating oil stain, not paint — painted timber frame reads as suburban
Pergola Material Guide: Cedar, Treated Pine, Aluminum, Vinyl & Steel
Material choice determines cost, lifespan, maintenance burden, and whether the pergola will support climbing plants. Every material works; the wrong one is the choice that does not match your maintenance tolerance or climate.
Cedar
$5,000–$8,000Western red cedar is the best all-around pergola material for most climates. Naturally rot-resistant without chemical treatment, weathers to a silver-grey patina, accepts climbing plant attachments without splitting, and has a low expansion/contraction coefficient so hardware stays tight. Costs more than pressure-treated pine but requires no staining or sealing if natural weathering is acceptable.
Lifespan: 20–30 years untreated; 30–40 years with periodic oil stain. Maintenance: Optional staining every 3–5 years to preserve colour; zero maintenance if silver-grey patina is acceptable.
Pressure-treated pine
$3,000–$5,000Southern yellow pine impregnated with copper-based preservative (ACQ or CA-C) under pressure. The most economical pergola material and widely available in standard dimensional lumber sizes. The green tint fades within 6–12 months to grey-brown. Requires staining or sealing every 2–3 years to prevent checking and splintering. Accepts paint and stain well once dry (wait 6–12 months after installation before finishing).
Lifespan: 15–25 years with regular maintenance; 8–12 years if neglected. Maintenance: Mandatory staining every 2–3 years; annual inspection for loose hardware.
Aluminum
$6,000–$10,000Extruded aluminum sections with powder-coated finish. Zero maintenance, rust-proof, and integrates LED lighting, motorized louvers, and retractable canopy tracks more elegantly than wood. The thin structural profile (3–4 inches) suits modern architecture. Does not accept climbing plant attachments well — vines require separate trellis support. Aluminum is the right choice when maintenance avoidance is the top priority.
Lifespan: 30–50 years. Maintenance: Rinse with hose annually to remove pollen and dirt; no sealing or refinishing ever required.
Vinyl (PVC)
$4,000–$7,000Hollow extruded vinyl sleeves over aluminum or pressure-treated wood cores. Marketed as maintenance-free and available in white, tan, and grey. The material never requires painting, but it also never ages gracefully — vinyl looks identical at year 1 and year 15, which reads as artificial in garden settings. Cheaper than aluminum but without the structural advantages. A compromise material that solves the maintenance problem without delivering a premium aesthetic.
Lifespan: 20–30 years. Maintenance: Wash with soap and water annually; no refinishing required.
Steel
$8,000–$12,000+Structural steel tube or I-beam construction, powder-coated or painted. Creates the thinnest structural profiles possible (2–3 inches) and the strongest spans — ideal for large pergolas (14×20 ft or larger) where wood would require excessively thick beams. Steel suits industrial, modern farmhouse, and contemporary aesthetics. Requires professional fabrication and installation; not a DIY material. The highest cost but also the most architecturally striking result.
Lifespan: 40–60 years with intact powder coating. Maintenance: Inspect coating every 5 years; touch up chips to prevent rust.
Material verdict
Cedar is the right default for most homeowners: good cost-to-lifespan ratio, ages gracefully, no mandatory maintenance, supports climbing plants. Pressure-treated pine is the budget choice if you are willing to stain every 2–3 years. Aluminum is the maintenance-free option for modern homes. Steel is for large pergolas and dramatic aesthetics only.
Sizing & Placement Rules: Proportions, Clearances & Orientation
A pergola that is too small reads as decorative and non-functional; too large overwhelms the yard and creates unusable shaded zones. These are the proportional and functional minimums that determine whether the structure works.
Size it against the permit threshold, not just the furniture
Before the proportions, one number decides how much paperwork this project is. Section R105.2 of the 2021 International Residential Code exempts from permit “other than storm shelters, one-story detached accessory structures, provided that the floor area does not exceed 200 square feet” (R105.2, Building item 1). Two words in that sentence do the work: detached, and 200.
- 10×12 ft = 120 sq ft — inside the exemption
- 12×14 ft = 168 sq ft — inside
- 12×16 ft = 192 sq ft — inside, with eight square feet to spare
- 12×20 ft = 240 sq ft, 14×20 ft = 280 sq ft — over the line
So the whole usable range on this page, up to 12×16 ft, is permit-exempt under the model code provided the pergola stands on its own. Attach it to the house and the exemption stops applying, because it is written for detached structures — which is a real cost of an attached pergola over and above the ledger detailing. If you are near the line, the cheap move is to pull the structure clear of the wall rather than shrink it.
The same section of the code governs two other things people build at the same time: fences up to 7 ft and retaining walls up to 4 ft measured from the bottom of the footing, unless they carry a surcharge. If a terrace is part of this project, our retaining wall guide works through that four-foot line, and the patio cost guide prices the paving a pergola usually stands on.
What the exemption does not do. R105.2 opens by stating that exemption from a permit “shall not be deemed to grant authorization for any work to be done in any manner in violation of the provisions of this code or any other laws or ordinances of this jurisdiction.” Setbacks, lot coverage, easements, utility clearances and HOA covenants all still bind a 120 sq ft pergola that needs no permit at all. Jurisdictions amend R105.2 freely, so treat 200 sq ft as the figure to check against your own building department rather than a nationwide guarantee.
Minimum footprint for function
10×12 ft is the smallest usable pergola. This accommodates a 6-person dining table (36×72 inches) with chair clearance, or a 3-seat sofa plus coffee table, with 18–24 inches of walking clearance on all sides. Anything smaller functions as an arbor, not a room-defining structure.
12×14 ft or 12×16 ft is ideal for most residential patios. This size covers a dining zone plus a small lounge area, or a single large seating arrangement with breathing room. Larger pergolas (14×20 ft) are appropriate for pool surrounds or outdoor kitchens but can overwhelm yards under 1,500 sq ft.
Clearance height
8 ft minimum under the rafters for a seating area. 9 ft minimum for a dining area with pendant lighting or a ceiling fan — standard fan blades require 7 ft clearance to the bottom of the motor housing, so 9 ft rafter height is the functional minimum.
Taller pergolas (10–11 ft) feel more open and airy but provide less shade. The shade footprint shrinks as height increases because the sun angle penetrates deeper under the rafters. For maximum midday shade, keep the clearance height at 8–9 ft and increase rafter density instead of raising the structure.
Rafter overhang
Rafters should extend 12–18 inches beyond the posts on all sides. This creates visual balance — a pergola with no overhang reads as unfinished and structurally awkward. The overhang also provides additional shade at the perimeter and protects post-to-beam connections from direct rain exposure.
Rafter spacing and orientation
Standard rafter spacing is 16–24 inches on center. 16 inches provides 40–50% shade from the rafters alone and creates a more enclosed, sheltered feeling. 24 inches provides 30–40% shade and feels more open. Wider spacing (30–36 inches) is appropriate only if climbing vines will fill the gaps.
Rafter orientation determines shade coverage. Rafters running east-west provide maximum midday shade because the sun crosses perpendicular to the boards. Rafters running north-south provide maximum morning and evening shade. For attached pergolas, run rafters perpendicular to the house wall to maximise shade over the patio.
Add cross-purlins (smaller boards running perpendicular across the tops of the rafters) for an additional 10–15% shade and a more traditional pergola silhouette. Purlins are decorative and optional but significantly increase the perceived density of the overhead structure.
Placement relative to the house
For attached pergolas, align one edge of the structure with a door or window frame to create a visual connection between interior and exterior. A pergola centered on a blank wall section reads as disconnected. For freestanding pergolas, position the structure where it will be visible from the primary indoor living space so it functions as a visual anchor, not a hidden backyard element.
Sun orientation and seasonal shade
Understand your yard’s sun path before placing the pergola. A south-facing patio receives full midday sun year-round; an east-facing patio is shaded by the house after noon; a west-facing patio is in full sun from 2–6 PM in summer. Orient the pergola to shade the zone during the hours you will use it most — typically late afternoon for evening dining or midday for weekend lounging.
Rule of thumb
Start with a 12×14 ft footprint, 9 ft clearance height, 18-inch rafter spacing, and rafters running perpendicular to the house. Adjust from there based on furniture size, sun angle, and aesthetic preference.
Cost Breakdown by Material & Configuration
Installed pergola cost varies by material, size, and whether the structure is attached or freestanding. These are 2025–2026 US national averages for a 10×12 ft structure, including materials, labour, and footings.
| Material | Attached | Freestanding | Lifespan |
|---|---|---|---|
| Pressure-treated pine | $3,000–$5,000 | $4,000–$6,500 | 15–25 yrs |
| Cedar | $5,000–$8,000 | $6,500–$10,000 | 20–30 yrs |
| Vinyl | $4,000–$7,000 | $5,500–$9,000 | 20–30 yrs |
| Aluminum | $6,000–$10,000 | $8,000–$12,000 | 30–50 yrs |
| Steel | $8,000–$12,000 | $10,000–$15,000 | 40–60 yrs |
Freestanding pergolas cost 20–30% more than attached versions due to doubled post count, deeper footings, and additional lateral bracing. Larger sizes (12×16 ft, 14×20 ft) increase cost proportionally: roughly 30–40% more for a 12×16 ft structure, 60–80% more for 14×20 ft.
Additional cost factors
- Integrated lighting: $500–$1,500 for LED strip channels, downlights, or pendant fixtures
- Retractable canopy: $800–$2,500 for manual or motorized fabric shade system
- Motorized louvers: $3,000–$8,000 for adjustable slat roof system (aluminum only)
- Electrical trenching and outlets: $400–$1,200 if not run during initial build
- Decorative knee braces or corbels: $200–$600 depending on complexity
Budget rule
Plan for $6,000–$8,000 installed for a mid-range 12×14 ft cedar pergola with basic lighting. Add 25–30% if freestanding, 20–40% for premium materials (steel, large timber), and 10–30% for integrated shade or electrical upgrades.
Shade & Planting Options: Vines, Retractable Canopies & Louvers
A bare pergola provides 30–50% shade from rafters alone. For full shade, add one of these systems. Each changes the character and maintenance profile of the structure.
Climbing vines (wisteria, grapevine, climbing roses)
$50–$200 plantsThe most aesthetically integrated shade solution. Plant wisteria, grapevine, climbing roses, or jasmine at the base of pergola posts and train them up and across the rafters. Vines provide 60–80% shade after 2–3 growing seasons, create dappled light that feels softer than fabric shade, and change seasonally — flowering in spring, full foliage in summer, bare in winter for passive solar gain.
Best vines for pergolas
- Wisteria: Fast-growing, fragrant spring blooms, heavy coverage. Requires annual pruning to prevent structural damage.
- Grapevine: Edible fruit, fast coverage, large leaves for dense shade. Drops fruit debris in late summer.
- Climbing roses: Fragrant blooms, moderate coverage. Requires deadheading and thorn management.
- Clematis: Prolific blooms, lighter coverage. Ideal for decorative accents rather than full shade.
Retractable fabric canopy
$800–$2,500A manual or motorized fabric panel that slides along an overhead track mounted to the pergola rafters. Provides 90–100% shade when deployed, retracts fully when not needed. The most flexible shade solution — full sun or full shade on demand. Fabric must be retracted in high wind (over 25 mph) and should be removed or stored for winter in snow climates.
Fabric options: Sunbrella acrylic (most durable, fade-resistant, 5–8 year lifespan) or HDPE shade cloth (budget option, 3–5 year lifespan). Choose neutral tones (grey, sand, charcoal) that match the home exterior.
Fixed louvers or slats
$1,500–$4,000Horizontal slats (typically 1×4 or 1×6 boards) installed perpendicular to the rafters at 4–6 inch spacing. Provides 70–90% shade depending on slat spacing and pitch. The most architecturally integrated permanent shade solution. Can be painted to match the pergola or left natural to weather. Adds significant visual density to the overhead structure.
Motorized louver upgrade: $3,000–$8,000 for aluminum louvers that rotate 0–120 degrees via remote control, allowing adjustable shade from 0–100%. The premium option but also the most versatile and weather-resistant.
Polycarbonate or acrylic panels
$1,200–$3,500Clear or frosted rigid panels installed between rafters. Provides full rain protection while preserving 80–90% light transmission. Turns the pergola into a semi-enclosed outdoor room usable in all weather. Polycarbonate is more impact-resistant and UV-stable than acrylic. This option changes the structure’s character significantly — it becomes a covered patio rather than an open pergola.
Shade verdict
For traditional and rustic pergolas, plant climbing vines for the most integrated, seasonally adaptive shade. For modern pergolas, use a retractable canopy for flexibility or motorized louvers for the premium solution. Fixed slats are the right middle ground when budget and aesthetics both matter.
30 Pergola Ideas & Styles, Organised by Design Direction
Every pergola falls into one of five design directions. Understanding which direction fits your home’s architecture is the fastest way to eliminate 80% of the options before you start shopping.
Flat-Rafter Steel Pergola
Narrow steel beams and posts, powder-coated in matte black or anthracite, create the clean geometric shadow lines that define modern outdoor aesthetics. Flat rafters (no decorative cutouts) keep the silhouette sharp. This design works on homes with flat rooflines, large glass panels, and minimal ornamentation — it conflicts with traditional or cottage architecture.
Variations 2–6 in this direction: powder-coated aluminum louver system, corten steel weathering-finish frame, concrete post with timber rafter hybrid, cantilevered monopitch design, and cable-tensioned shade sail hybrid.
Verdict
Best for homes built after 2010 with contemporary architecture. Requires professional installation — welding or precision bolted connections are not DIY-friendly. Budget an additional $2,000–$4,000 for LED strip lighting integrated into the beam channels.
Cedar Attached Pergola with Decorative Rafter Tails
The most versatile pergola material for residential use. Decorative rafter tails (angled or curved cuts at the ends of each rafter) add visual weight without structural complexity, making the pergola read as considered rather than utilitarian. Cedar weathers to silver-grey if left untreated — handsome on its own, or seal it to maintain the honey tone.
Variations 8–13: white-painted cedar with lattice sides, natural redwood with built-in bench seating, painted white with climbing rose planting, cedar with exposed timber post bases in concrete, reclaimed timber rustic style, and pressure-treated pine budget version.
Verdict
The reliable all-rounder. Suits the widest range of home styles, works with every plant type, and sits in the middle of the cost range. If you are undecided on style, start here.
Timber Frame Freestanding Pergola with Four-Post Base
A four-post freestanding structure anchored with concrete footings 18–24 inches deep. Works over a garden seating area, pool surround, or as a mid-yard destination. The visual weight of four posts means the proportions matter — minimum 12×12 ft to avoid looking cramped; 14×16 ft is ideal for a dining group.
Variations 15–19: poolside pergola with privacy screen on one side, octagonal gazebo-pergola hybrid, double pergola corridor between garden zones, pergola with integrated raised planting beds at post bases, and pergola with overhead string lights and curtain panels.
Verdict
The prestige option for large backyards. Requires professional installation due to footing requirements but creates a true outdoor destination rather than a patio extension.
Motorised Aluminium Louvered Pergola
Adjustable slats rotate from fully open (maximum light, no shade) to fully closed (rain-proof, 100% shade) via remote or app. Integrated drainage channels in the beams carry water to downpipes in the posts. This is not a summer structure — it extends the outdoor season by 3–4 months in temperate climates.
Variations 21–24: fixed timber louver insert for a standard pergola (lower cost), polycarbonate panel roof insert, adjustable shade sail between fixed rafters, and retractable fabric canopy with motorised track.
Verdict
The highest-performing pergola category — transforms any patio into a year-round room. See what a louvered pergola looks like in your specific yard before spending $15,000 on one.
Visualise it in my yard →White-Painted Cedar with Climbing Rose and Lattice Sides
White paint, lattice side panels, and a climbing rose (New Dawn or Cecile Brunner) is the defining image of the English garden pergola. The lattice provides immediate visual softness even before the plant matures. Add a gravel floor and two white-painted chairs for instant atmosphere. Maintenance is higher than natural wood — paint every 5–7 years — but the aesthetic is worth it for the right property.
Variations 26–30: Japanese torii gate pergola with bamboo infill, Mediterranean blue-and-white with bougainvillea, Tuscan stone-post pergola with wisteria, reclaimed timber with wildflower meadow surround, and Victorian cast-iron pergola reproduction.
Verdict
The most photogenic pergola category at maturity. Requires patience — the full effect takes 2–3 growing seasons — but no structural style ages as well when plants take over.
Real Backyards Transformed: Three Worked Examples
Three common backyard scenarios and how pergola placement, size, and material transform each one — with the single decision that made the design work.
1. Small Urban Patio: Maximising a Compact Space
A 10×10 aluminium pergola attached to a small townhouse creates shade over a 6-person dining table. The minimal footprint maximises the remaining yard for potted plants and movement. Modern aluminium keeps the aesthetic clean and contemporary.
The pergola is positioned directly outside the kitchen door — morning coffee can be taken beneath it, and evening dinner happens in shade. It feels like an indoor room with open walls.
Key decision: Attach to house to save ground space and create seamless indoor-outdoor flow.
2. Medium Suburban Yard: Entertainment Zone
A 12×12 cedar pergola sits on a large stone patio, serving as the anchor for an outdoor entertaining zone. Positioned 15 feet from the house, it’s visible from the kitchen windows and creates a destination feel that draws people outside.
Climbing clematis and wisteria are trained onto the pergola, adding soft natural shade by mid-summer while blooming beautifully in spring. The wood stain is refreshed every 2 years, maintaining a warm honey tone.
Key decision: Freestanding placement creates a visual anchor; climbing vines add layers over time without additional structure.
3. Large Estate: Pergola Over Lounge Seating
A 14×16 white pergola defines a lounge zone on a large estate property. Positioned to receive afternoon shade, it provides relief from harsh western sun while maintaining openness. Four large outdoor seating pods fit comfortably beneath it.
The pergola is intentionally minimal — clean lines let the garden plantings and seating design shine. The scale feels substantial but not overwhelming, anchoring the rear garden while leaving room for other features.
Key decision: Large size works because the property supports it; minimal design prevents visual clutter.
Best Plants for a Pergola: What Works and Why
No other garden element matures as dramatically as a pergola with the right climber. The choice of plant determines the visual atmosphere, the maintenance schedule, and whether your structure eventually feels organic or merely structural.
- Wisteria: The classic choice. Spectacular spring bloom, dense summer shade, fragrant. Roots are vigorous — plant inside a buried root barrier. Requires annual hard pruning (twice in some climates). Can damage lightweight structures over 20 years if not managed.
- Climbing roses (New Dawn, Cecile Brunner): Repeat-flowering, fragrant, and widely available. Thorns make maintenance access fiddly. Train horizontally along rafters to maximise flower production — roses flower on lateral growth, not vertical.
- Grapevine: Edible output, beautiful autumn colour, sculptural winter silhouette. Requires annual hard pruning to a set framework in late winter. Best for cedar or timber pergolas where tendrils grip the wood naturally.
- Clematis: Fastest coverage — full frame in one season for vigorous varieties. Available in every colour. Choose group 3 (hard prune in late winter) for easiest management. Mix with climbing roses for sequential flowering.
- Virginia creeper: The low-maintenance option. Covers a pergola in 2 seasons, spectacular scarlet autumn colour, withstands shade and neglect. Not suitable if you want flowers — the value here is foliage mass and seasonal colour.
Planting rule of thumb
Match the vine to your USDA hardiness zone, plant 6–12 ft apart at the post bases, and train the growth onto the rafters with ties or clips. Most climbers take 2–3 seasons to reach full coverage — wisteria and clematis are the fastest, Virginia creeper the most forgiving.
See Your Pergola Design on Your Actual Yard Before You Build
A pergola in the wrong location, wrong scale, or wrong material is an $8,000 structure that makes your yard less functional. Seeing the design on your actual property — not a stock photo or a Pinterest board — is the only way to evaluate whether the placement, size, and style work before construction starts.
Hadaa renders pergola designs into photos of your specific yard with correct scale, perspective, and shadow placement. Three engines cover every scenario:
Garden Autopilot — full backyard transformation
22 renders from one photoUpload a photo of your yard and the engine generates 12 full backyard transformation renders across four styles, including pergola and covered patio options. You pick your favourites, and each gets a best-light showcase image automatically — so you see the pergola from the back door, from the garden, from the side, at night, and at golden hour. The full pipeline costs $9 per project and includes planting guide, blueprint, and bill of quantities.
Smart Fix — add a specific pergola by text
Already have a render or yard photo? Use Smart Fix to type exactly what you want: "add a cedar pergola over the patio with string lights" or "replace the existing awning with a modern steel pergola." The engine places it into your specific scene with correct depth, scale, and lighting. No redesign of elements you want to keep.
Style Presets — preview different pergola aesthetics
Apply 48+ landscape styles to your yard photo with a single click. Use the masking brush to protect existing elements — mature trees, fencing, planting you want to keep — and let the preset redesign the patio and pergola zone only. Run three or four material directions (rustic wood, modern steel, white-painted) in parallel and compare them side by side.
The maths
$9
Hadaa render project
$3K–$12K
Pergola build
Frequently Asked Questions
What is the difference between a pergola, gazebo, and arbor?
How much does a backyard pergola cost?
What is the best material for a pergola?
How tall should a pergola be?
Do pergolas provide enough shade?
Should I attach a pergola to my house or make it freestanding?
Can I see what a pergola will look like in my yard before building?
Do I need a permit for a pergola?
What plants grow well on a pergola?
What is the difference between a pergola and a louvered pergola?
What pergola style works best for a small backyard?
See it before you build it
See your pergola design on your actual yard before you commit.
Upload one photo. Type the pergola style, material, and placement you want. Get a photorealistic render of your specific yard — cedar, steel, attached, or freestanding — before a contractor quotes you a single dollar.


