
Backyard Fire Pit Ideas: 50+ Designs, Costs & Layout Tips
A fire pit anchors an outdoor gathering space, extends your yard's usable season, and serves as a focal point for evening entertaining. The challenge: knowing where to put it, how much space it needs, what style fits your home, and how much it will actually cost to build. We've collected 50+ real fire pit designs, broken down costs by budget tier, mapped out the safety clearances and seating distances that actually work, and shown you how to visualize a fire pit in your specific yard before you build. If the patio under it is still undecided, patio costs by material is the companion figure — and on the resale numbers above it is the better half of the budget. On a sloped site, work out the levels first with garden steps and their code limits.
Quick Answer
- Budget $1K–$2K? Gravel pad, portable seating, Solo Stove Bonfire — rustic and functional.
- Budget $5K–$10K? Concrete or paver patio, built-in benches, mid-range fire table.
- Budget $15K+? Custom stonework, pergola, integrated seating, professional landscaping.
- Safety first: 25 feet from any structure or combustible material for a wood fire (the fire code’s recreational-fire distance — not the 10 feet most guides print, which is a gas-appliance figure), 6–8 feet from the seating edge, never under a pergola.
- What it returns: a fire feature scores 9.7 out of 10 for homeowner joy and recovers about 56% of its cost at resale — the second-worst return of eleven outdoor projects. Build it for your evenings, not for the sale.
- Visualize before building: Hadaa's Garden Autopilot generates up to 22 renderings of a fire pit in your actual yard from $9 — see exactly how it fits before spending thousands.
Winnie Astrid
Garden Design Editor
Safety, Clearance & Seating Distance: The Non-Negotiable Rules
Before style, before budget, before design — safety. Every fire pit needs clearance and every gathering area needs comfortable sightlines.
Clearance from Structures
Horizontal clearance — wood fire: 25 feet. This is the number almost every fire pit guide gets wrong, including the earlier version of this one. The International Fire Code, as fire departments publish it to homeowners, puts it plainly: “Recreational fires shall not be conducted within 25 feet of a structure or combustible material” (Fairfax County Fire Marshal, Recreational Fires Guidelines; City of Minneapolis states the same 25 feet). Combustible material includes the fence, the woodpile, the shed, the deck and the bark mulch — not just the house.
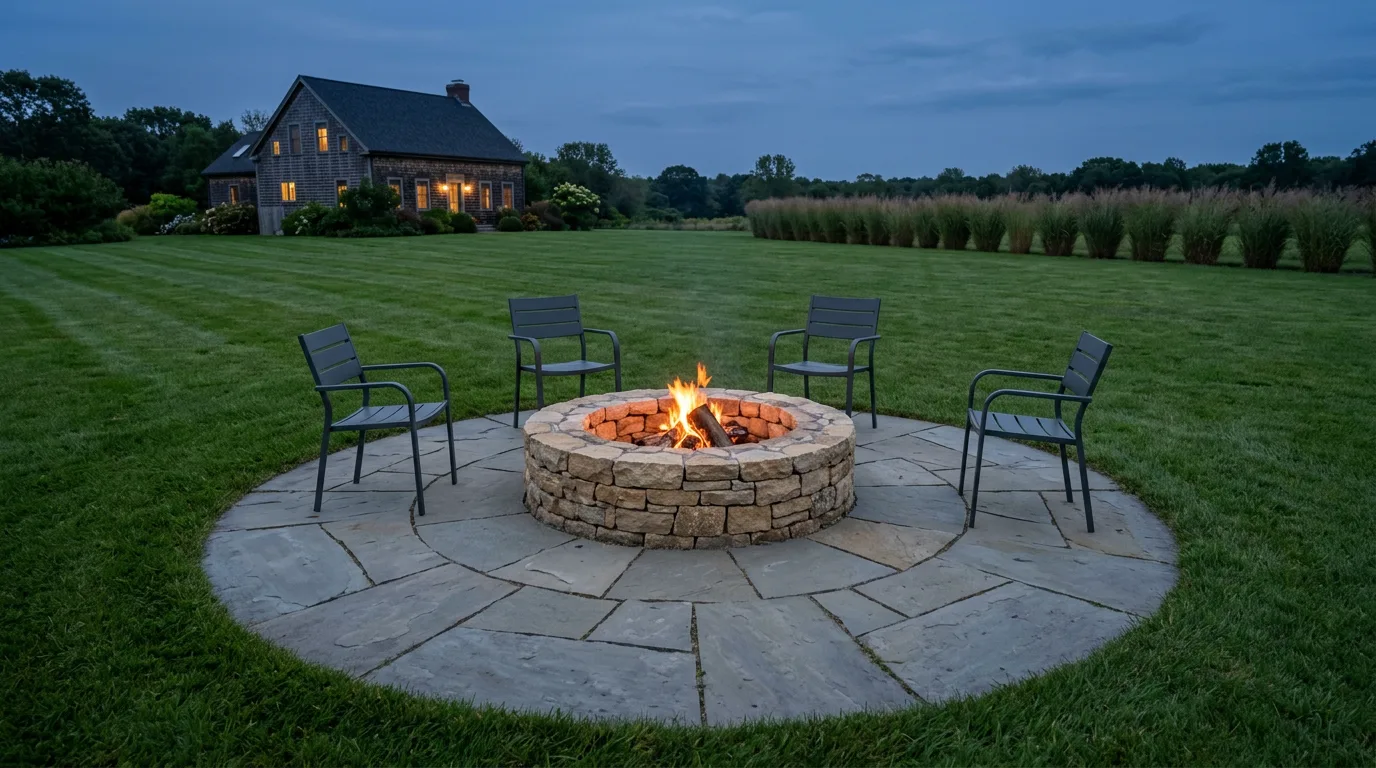
And “recreational fire” has a size. The same sources define it as a fuel area 3 feet or less in diameter and 2 feet or less in height, attended constantly until completely extinguished, burning seasoned wood and nothing else. A bigger fire is open burning, which is a different permission with longer setbacks. So the 4-foot masonry ring in the inspiration photo is not a recreational fire.
Horizontal clearance — listed gas appliance: read the label. The familiar 10-foot figure is not from the fire code. It comes from manufacturers' instructions for listed gas fire pits and fire tables, which are appliances rather than open fires and are installed to the clearances printed on their own data plate. If you are buying a gas fire table, that label is the authority and it may say more or less than 10 feet. If you are stacking stone around burning logs, 25 feet is the number.
Overhead clearance: Never place a fire pit under a pergola, shade sail, or overhanging tree branches — even open-slat pergolas. Branches lower than 12 feet should be pruned back. Dense tree canopies should be removed entirely above the fire pit.
Property line: not in the model code. The fire code measures from structures and combustible material, not from the boundary, so any “15 to 20 feet from the property line” rule you read is somebody's local ordinance quoted as though it were national. Some jurisdictions set one, many do not, and some instead restrict when you may burn — Minneapolis allows a recreational fire only between 9 a.m. and 10 p.m., and only when the wind is under 10 mph. One call to your fire department settles all three questions: setback, hours and whether a permit or a seasonal burn ban applies.
Seating Distance & Gathering Zone Size
Ideal seating distance: 6–8 feet from the edge of the fire bowl. This is where the warmth is comfortable and conversation is easy. For large fire pits (30+ inches), move to 8–10 feet.
Total gathering area: Plan for a circular zone 12–15 feet in diameter around the fire pit — which, with the 25-foot clearance, is the real reason a fire pit needs a big garden rather than a corner of one; small backyard ideas has the alternatives when the geometry simply does not fit. This accommodates 4–6 people comfortably. A 20-foot diameter zone handles 8–10 people with breathing room.
Seating arrangement: Arrange chairs in a loose circle or semi-circle that opens toward the fire. Avoid completely surrounding the fire pit — it blocks sightlines and traps smoke.
Standing room: Always leave one side of the fire pit relatively open. People naturally gravitate to the fire for warmth; an open sightline to the flames is more important than seating density.
Seating Arrangement Options
- Semi-circle arrangement — Most common: 4–6 Adirondack chairs or lounges in a semi-circle facing the fire. Opens one side for approach and visual interest.
- Full circle with gap — 8–10 chairs around the perimeter with one intentional opening 4–6 feet wide. Formal but allows air circulation.
- Sectional + side seating — Built-in or semi-permanent seating (bench, sectional) on one side, individual chairs on others. Great for mixed group sizes.
- Asymmetrical gathering — Bench on one side, chairs on others, standing area for s'mores making. Most flexible for actual use.
Fire Pit Cost Breakdown: What You Actually Pay
Fire pit costs break into five categories: the fire pit itself, the patio surface, seating, landscaping/framing, and installation labor.
| Budget Tier | Total Cost | Fire Pit | Patio/Base | Seating | Landscaping |
|---|---|---|---|---|---|
| Rustic Entry | $1,000–$2,000 | Solo Stove Bonfire ($400–$600) | Gravel pad ($200) | Portable chairs ($400–$600) | Container plants ($100–$200) |
| Comfortable | $3,000–$5,000 | Propane table ($800–$1,200) | Concrete pavers ($600–$1,000) | Sectional + lounge ($1,000–$1,500) | Perimeter planting ($400–$800) |
| Mid-Range | $8,000–$12,000 | High-end propane ($1,500–$2,000) | Multi-material patio ($2,000–$3,500) | Built-in benches + chairs ($1,500–$2,000) | Mature plantings + pergola ($1,500–$2,500) |
| Premium | $15,000–$25,000 | Designer fire table ($2,500–$4,000) | Custom stonework ($4,000–$8,000) | Integrated seating + furniture ($2,000–$3,000) | Full landscape design ($3,000–$6,000) |
| Luxury | $25,000+ | Custom-built fireplace ($5,000+) | Architectural stonework ($8,000+) | Outdoor kitchen + seating ($5,000+) | Complete yard renovation ($5,000+) |
What a fire pit returns — and why that is fine
The table above is what you pay. One number is worth having before you commit to the premium tiers: in the 2023 Remodeling Impact Report: Outdoor Features, the National Association of REALTORS® and the National Association of Landscape Professionals priced a fire feature — dry-stacked stone kits with a gas burner and a 10-foot flagstone patio — at a $9,000 professional estimate against $5,000 recovered at resale: 56%. That is the second-lowest of eleven outdoor projects, where a new patio recovers 95% and an outdoor kitchen 100%.
In the same report the fire feature scores 9.7 out of 10 on the owners' own joy score, with 78% reporting more enjoyment of being at home. So the honest framing is the one no listicle uses: a fire pit is among the worst outdoor projects for resale and among the best for living there. Building to sell? Put the money in the patio and let the fire pit be portable. Building for your own evenings? The 56% is the price of the evenings, and it is the cheapest way to make a garden usable in April and October.
For the renovation, reline, gas-conversion and size-by-size figures — and the full resale workings — see the fire pit cost guide. This page is about what to build; that one is about what it costs.
Hidden Costs to Budget For
- Installation labor — 30–50% of material costs. $1,500–$5,000+ depending on scope.
- Gas line connection (natural gas) — $1,500–$3,000 if running a new line. Included if you have existing outdoor gas.
- Permits & inspections — $200–$500 in most jurisdictions. Required for built-in fire pits.
- Site prep (grading, drainage) — $500–$1,500 if your yard has slopes or poor drainage.
- Tree removal or pruning — $200–$2,000 if overhead branches need removal.
- Irrigation relocation — $300–$800 if sprinkler heads are in the way.
Pro Tip: Visualize Before You Spend
Before committing to any budget, use Hadaa's Garden Autopilot to generate renderings of a fire pit in your yard ($9). You'll see exact material quantities and cost estimates for your specific design — no guesswork, no expensive surprises when contractors show up.
50+ Fire Pit Design Styles: Find Your Aesthetic
Fire pits work across every landscape style. Here are the most common approaches, with real design principles that make each one work.
Modern Minimalist
Clean concrete, steel edges, recessed fire bowl. Seating: low-profile lounge chairs or built-in benches. Planting: architectural grasses, vertical elements. Works best on flat sites with geometric hardscape.
Rustic Cottage
Natural stone, wood seating, organic plantings. Fire pit sits in a bed of gravel surrounded by perennials. Seating: Adirondack chairs, bistro tables. Asymmetrical, cozy, forgiving of 'imperfection'.
Desert Modern
Decomposed granite base, specimen cacti, geometric fire pit in corten steel. Clean lines, warm materials, sculptural plants. Zero lawn, maximum drama.
Mediterranean
Stone patio, olive trees, terracotta pots, relaxed gathering. Fire pit as evening anchor after al fresco dining. Pergola overhead for day shade.
Contemporary Outdoor Room
Pergola, multiple seating zones, integrated fire pit. Looks like an extension of your house. Minimal planting, maximum functionality.
These represent just 5 of the 50+ styles Hadaa's Garden Autopilot generates automatically — see your fire pit rendered in cottage, modern, tropical, Mediterranean, Japanese, and desert styles from a single yard photo.
Where to Place Your Fire Pit: Location Checklist
The Ideal Fire Pit Location Has These Traits
Visible from your main living area
You want to see the fire lit and glowing from your kitchen, living room, or deck. A fire pit that requires walking is a fire pit that doesn't get used.
Protected from prevailing wind
Check your local wind patterns. A fire pit in a wind tunnel produces smoke and uneven flames. Plant a windbreak if necessary, or site it in a natural wind shadow.
Away from dense shrubs and trees
Overhanging branches create fire hazards. Low-hanging limbs collect embers. Dense shrubs trap smoke. Prune generously.
On level ground
Slopes cause uneven flames and water pooling after rain. Grade the site or build a level pad.
On aggregate, never grass or mulch
Gravel, paving, or composite mats only. Grass and mulch will char or ignite. Bare soil holds moisture and turns to mud.
Away from high-traffic paths
You want people to choose to go to the fire pit, not trip over it on the way to the fence.
Close enough to power and water (optional)
If you're planning string lights or an outdoor shower, site the fire pit within reasonable reach.
Location Mistakes to Avoid
- In a wind tunnel between buildings — Smoke blows into your face and your neighbors' homes. Choose a more sheltered spot.
- At the lowest point of your yard — Water collects here after rain. Drainage is your friend.
- Under deciduous trees — Leaves fall into the fire. Branches overhead are safety hazards. Save the tree; move the pit.
- Between the patio and the lawn — Creates a barrier. Most gathering spaces work best as extensions of your main patio, not as isolated islands.
- Where you've buried utilities — Call 811 before digging. Gas, electric, water lines are non-negotiable hazards.
Real Fire Pit Designs by Budget
Here are five detailed design examples, each representing a different budget level. Each includes the fire pit choice, base material, seating strategy, and landscaping approach.
$1,000 Budget: Rustic Entry
Gravel pad, Solo Stove Bonfire, Adirondack chairs, container plants.
Best For
First-time fire pit owners, small yards, renters with permission, those who like seasonal flexibility.
$5,000 Budget: Comfortable Mid-Range
Concrete pad, propane fire table, sectional + lounge seating, perimeter plantings.
Best For
Established homeowners, medium-sized backyards, serious year-round entertaining, propane budget.
$12,000 Budget: High-End Comfort
Multi-material patio, high-end propane fire table, built-in benches, mature landscaping, pergola.
Best For
High-end projects, properties with mature landscaping vision, 10+ year commitment, outdoor entertainment priority.
Material Choices: Fire Pit, Base & Furniture
Fire Pit Material & Type
Steel (Corten)
$300–$800✅ Pros: Rustic patina, low cost, lightweight. Develops beautiful orange rust over time.
❌ Cons: Wood-burning only. Requires log storage. Smoke management needed.
Best for: Rustic, cottage, industrial aesthetics. Small to medium yards.
Stainless Steel (Solo Stove)
$400–$800✅ Pros: Smokeless wood-burning. Premium finish. Portable. Design award winner.
❌ Cons: More expensive than basic steel. Still requires firewood.
Best for: Modern homeowners who want wood fire without smoke hassle.
Propane Fire Table
$800–$4,000✅ Pros: Button ignition. No ash cleanup. Controllable flames. Works on decks with proper stand.
❌ Cons: Ongoing propane cost. No 'campfire' smell. Requires tank management.
Best for: Low-maintenance, high-use fire pit areas. Propane-ready properties.
Natural Gas Fire Pit
$1,500–$5,000 (including installation)✅ Pros: Lowest operating cost if you have existing gas line. Permanent installation. Always available.
❌ Cons: Expensive to install new line ($1,500–$3,000). Not portable.
Best for: High-end projects with existing gas infrastructure.
Concrete or Stone (Built-In)
$2,500–$8,000✅ Pros: Custom design. Architectural impact. Long lifespan. Can incorporate bench seating.
❌ Cons: Most expensive option. Not portable. Requires professional installation and permits.
Best for: Permanent, high-end landscape designs.
Base Materials
| Material | Cost/sq.ft | Durability | Maintenance | Aesthetic |
|---|---|---|---|---|
| Gravel (pea) | $0.50–$1 | Casual, refresh yearly | Rake, edge | Rustic, informal |
| Mulch | $1–$2 | 1–2 years, refresh | Add regularly | Garden-like |
| Concrete poured | $6–$12 | 20+ years | Seal every 2–3 years | Modern, clean |
| Pavers (concrete) | $4–$8 | 15+ years | Minimal, occasional reset | Structured, classic |
| Bluestone | $8–$15 | 30+ years | Seal annually | Premium, architectural |
| Flagstone | $8–$18 | 30+ years | Seal if needed | Rustic-premium |
Seating & Furniture Strategy
Adirondack Chairs
Classic, comfortable, iconic. $150–$400 each. Great for cottage and traditional styles. Durable teak or plastic options.
Sectional Sofa
Best for larger groups. $1,500–$3,500. Creates an 'outdoor room' feeling. Choose weather-resistant fabric.
Built-In Benches
Permanent seating around the fire pit perimeter. $2,000–$5,000+. Works for fixed-location fire pits. Great for small yards.
Lounge Chairs/Daybeds
Premium comfort. $600–$2,000 each. Best for design-forward projects. Less conversational than facing seating.
Fire Pit Seating Ring
Low stools/poufs that circle the fire. $200–$600 per set. Flexible, casual, space-efficient. Easy to move.
Dining Table + Chairs
$1,000–$3,000+. Combines entertaining with dining. Smaller than dedicated sectionals. Works for mixed-use spaces.
Visualize Your Fire Pit Before Building: The Smart Approach
Why visualization matters
A poorly sited fire pit costs thousands to relocate. A style mismatch creates buyer regret. Underestimating material quantities leads to contractor disputes. Visualization prevents all three problems.
Professional landscape architects spend 1–2 weeks and $2,000–$5,000 producing concept renderings. Hadaa's Garden Autopilot produces 22 photorealistic renderings of your specific yard in under 60 seconds for $9.
How to Use AI Design Tools for Fire Pit Planning
1. Take Clear Yard Photos
4–6 photos of your yard from different angles in good natural light. Include existing structures, fence lines, trees, and the ground. Midday or late afternoon light is ideal.
2. Upload to an AI Tool
Hadaa's Garden Autopilot accepts photo uploads. Describe your style preference: 'modern minimalist', 'rustic cottage', 'Mediterranean', etc. The AI generates 12 base renderings automatically, three views in each of four styles.
3. Review Style Variations
You see your yard rendered in your chosen style with a fire pit, seating, and surrounding plantings. Pick the rendering that feels right. This takes 5 minutes.
4. Get a Showcase Image of Each Favourite
The tool generates 8 different viewpoints of the design you selected: aerial, near, far, boundaries, plus night and seasonal previews. See how the space looks from every vantage point.
5. Export Material Lists & Cost Estimates
Hadaa provides a color-coded Blueprint (contractor-ready) and a Planting Guide with quantities, materials, and cost estimates. Hand this directly to landscape contractors for accurate bids.
6. Get Contractor Quotes Before Committing
Armed with renderings, a blueprint, and material specs, contractors can quote accurately. Compare 2–3 bids instead of guessing at scope.
Real-World Example: From Photo to Renderings
A homeowner in Portland uploads a photo of their 40×60 ft backyard with a mature oak tree, an existing deck, and an overgrown planting bed. They describe wanting a "modern cottage fire pit area." Garden Autopilot generates:
- 12 base renders — four styles, three views each, different plant combos
- Three views per style — overhead, from the deck, from the fire pit
- Planting guide — 14 plantings, 45 sq.ft of gravel, 120 sq.ft of patio
- Cost estimate — $8,500–$12,000 for professional installation
The homeowner shows three contractors the renderings. All three provide quotes within 5% of the AI estimate. The project moves forward with zero surprises.
Frequently Asked Questions
How much clearance does a fire pit need?
What is the ideal seating distance from a fire pit?
What's the difference between a wood-burning and propane fire pit?
Can you put a fire pit on a deck or patio?
How much does a backyard fire pit area cost to build?
What is the best location for a fire pit in my backyard?
Can I design my fire pit area before building?
See your fire pit in your yard — instantly
Garden Autopilot — 22 Renderings for $9
Upload a photo of your backyard. Get photorealistic renderings of a fire pit in cottage, modern, rustic, Mediterranean, and desert styles. Plus a zone-verified planting guide, contractor blueprint, and bill of quantities. No learning curve. No guesswork.


